


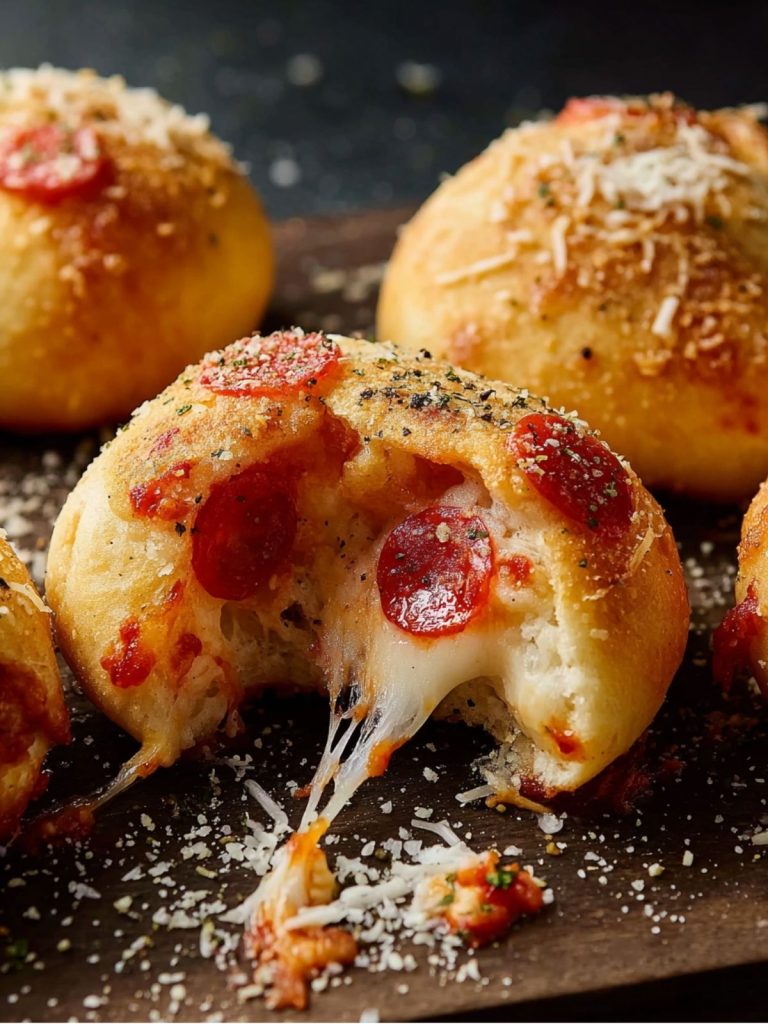
I’ve found that these Pizza Bombs are irresistibly easy to prepare, using simple ingredients like dough, cheese, and your choice of toppings, all delivering a burst of classic pizza flavors in every bite.
It all started on a lazy Sunday afternoon when I craved something comforting yet uncomplicated. Flipping through my old family recipe book, I stumbled upon these delightful Pizza Bombs—a creation I hadn’t tasted since childhood. Remembering the joy of crafting these gooey, cheesy delights with my grandmother, I decided to recreate the magic.

This recipe is special not only for its nostalgic value but also for its practicality. It’s budget-friendly and requires minimal preparation, making it a perfect go-to for busy evenings or surprise gatherings. By following this simple recipe, you’ll be saving time while treating yourself to a unique and flavorful culinary experience.
Why You’ll Love Pizza Bombs?
I’m confident that once you try these Pizza Bombs, they’ll become a staple in your cooking repertoire for several compelling reasons:
- Effortless Preparation: The recipe is designed with simplicity in mind, allowing for quick assembly without compromising on taste.
- Rich, Robust Flavors: Each pizza bomb is packed with gooey cheese and your favorite toppings, creating a delectable explosion of classic pizza taste that satisfies every craving.
- Versatile and Customizable: You can easily tweak the toppings to suit your preferences or use whatever ingredients you have on hand.
- Consistent Results: Thanks to tried-and-tested cooking techniques, these bombs ensure a perfect balance of crusty exterior and melty interior, delighting taste buds with every bite.
- Accessible to All Skill Levels: Whether you’re a novice or an experienced cook, the straightforward steps provide guidance for achieving mouthwatering results every time you make them.
“The simplicity of these Pizza Bombs is what makes them a go-to choice for anyone looking to enjoy homemade comfort food without the fuss.”

Ingredients Notes
- Refrigerated Biscuits: I love using buttery biscuits like Pillsbury™ Grands! for their flakiness and easy handling, providing the perfect pocket for our filling.
- Pizza Sauce: I choose a hearty sauce with rich tomato flavor and vibrant herbs, ensuring a savory balance that doesn’t overwhelm the other ingredients.
- Shredded Mozzarella Cheese: Opt for a low-moisture variety to achieve a gooey center that stretches with each bite, contributing creamy perfection.
- Pepperoni: Select thin, consistent slices that crisp up nicely, adding a peppery kick and dense, savory bites.
- Melted Butter: Brush the tops generously for a golden, crispy finish, enhancing richness and aiding in browning.
- Grated Parmesan Cheese: Use fresh Parmesan for its bold, nutty flavor that perfectly complements the garlic butter glaze.
- Italian Seasoning: A blend of oregano, basil, and thyme ties all flavors together with an aromatic bouquet, heightening every bite.
How to Make Pizza Bombs?
- Preheat & Prepare: Preheat your oven to 375°F (190°C). Line a baking sheet with parchment paper, which not only prevents sticking but ensures a crisp, evenly golden crust.
- Prepare the Dough: Carefully open the can of refrigerated biscuits, feeling the satisfying pop. Separate each biscuit and gently flatten them into discs about 1/4-inch thick with even pressure. Ensure the edges don’t thin out too much.
- Fill with Flavor: Spoon about 1 tablespoon of pizza sauce into the center of each disc. Pay attention to the rich, savory aroma as you layer on 1 tablespoon of pepperoni and roughly 2 cubes (or a generous sprinkle) of shredded mozzarella. Keep the filling compact to prevent overflow during baking.
- Seal the Bombs: Gently gather the dough edges up and over the filling, pinching them together firmly to form a tight seal. Roll each bomb lightly in your hands to ensure it holds its shape, resembling smooth, round dough balls.
- Brush & Season: Place the dough balls seam side down on the baking sheet. Brush the tops generously with melted butter and sprinkle with grated Parmesan. The fragrant, nutty aroma begins to hint at what’s baking within.
- Sprinkle Flavor: Dust each bomb with Italian seasoning, appreciating the burst of herbaceous scent that promises a delightful bite.
- Bake to Perfection: Bake in the preheated oven for about 15 minutes, or until the tops are beautifully golden and the aroma fills your kitchen. Keep an eye on them for a perfect golden-brown finish.
- Serve & Enjoy: Let them cool briefly before serving. The first bite reveals a warm, gooey center amidst a crisp and buttery crust, a true delight for your taste buds.
Expert Cooking Tips
- For crispy bottoms, bake on a lined preheated baking stone to mimic a brick oven effect.
- I prefer using freshly grated mozzarella for better melting quality compared to pre-shredded cheeses.
- Ensure no sauce touches the edge of the biscuit, as it can prevent proper sealing.
- If using an air fryer, check halfway to avoid burning – the browning happens quickly!
- I find a light dusting of flour on your hands helps in forming the dough balls perfectly.
- Keep the seasoning light; the focus should remain on the cheesy goodness inside.
- I refrigerate my dough briefly—it makes it easier to manage and less sticky.
Storage Tips
- Store leftovers in an airtight container in the fridge for up to three days to maintain freshness.
- Freeze baked bombs on a baking sheet first, then transfer to a Ziploc bag to prevent sticking.
- Reheat in an oven at 350°F to crisp the outside while warming the center.
- To prevent freezer burn, wrap each pizza bomb tightly with plastic wrap before freezing.
- Always cool completely before freezing to avoid ice crystals and sogginess.
- Label your storage bags with the date; it helps track freshness and prevents confusion.
Variations and Substitutions
- For a gluten-free option, use gluten-free biscuit dough or homemade gluten-free crust.
- Ditch pepperoni for turkey or chicken slices for a leaner variant.
- Substitute mozzarella with dairy-free cheese for a vegan twist.
- Add chopped veggies like mushrooms or bell peppers for a veggie-loaded variant.
- Swap traditional pizza sauce with pesto for a fresh, herby flavor.
- Explore a dessert version by using chocolate and marshmallow filling, dusted with cinnamon sugar.
- Enhance the flavor by adding a teaspoon of garlic powder to the melted butter before brushing.

What to Serve with Pizza Bombs?
- Caesar Salad: The crisp, tangy dressing pairs well with the rich pizza bombs, adding freshness.
- Garlic Bread: Doubles the comfort factor, adding a soft, buttery texture alongside the main dish.
- Roasted Vegetables: Offers a slightly sweet contrast to the savoriness of the pizza bombs with balanced flavors.
- Sweet Potato Fries: The subtle sweetness complements the savory profile, providing a nice textural contrast.
- Caprese Salad: The light, fresh flavors and creamy mozzarella balance the richness of the pizza bombs.
- Minestrone Soup: Add warmth and heartiness while matching the Italian flavors of the pizza bombs.
- Grilled Asparagus: Enhances the meal with its crisp texture and earthy taste complementing the bite-sized treats.
- Spinach Artichoke Dip: Rich, creamy dip pairs wonderfully with the hearty pizza bombs, amplifying the indulgence.
- Risotto: Its creamy, buttery texture pairs well, adding a sophisticated touch.
- Antipasto Platter: Complements with a variety of textures and flavors, enriching the overall dining experience.
- Pasta Salad: Light, refreshing flavors enhance the richness of the pizza bombs.
- Zoodle Salad: Provides a crunchy, fresh element that contrasts the richness.
FAQ
Use a preheated oven and avoid overloading with sauce.
Absolutely, freeze pre-baked and reheat for quick preparation.
Add more pepperoni or red pepper flakes for heat.
Ensure seals are tightly pinched to prevent ooze.
Use low-fat cheese and add veggies for a nutritious boost.
Irresistible Pizza Bombs Recipe

Craving a snack that packs a punch? Discover our irresistible pizza bombs recipe and transform your pizza experience into a bite-sized delight. Ready to indulge?
- Prep Time: 15 minutes
- Cook Time: 15 minutes
- Total Time: 30 minutes
- Yield: 8 pizza bombs
- Category: Appetizer/Snack
- Method: Baking
- Cuisine: Italian-American
- Diet: Vegetarian
Ingredients
- One 16-ounce can of refrigerated biscuits, like Pillsbury™ Grands!
- Half a cup of pizza sauce, adjust as desired
- Half a cup of shredded mozzarella, adjust as desired
- Half a cup of pepperoni slices, adjust as needed
- Quarter cup of melted butter
- Two and a half tablespoons of grated Parmesan cheese, or to taste
- One teaspoon of Italian seasoning
Instructions
- Preheat & Prepare: Begin by preheating your oven to 375°F (190°C). Line a baking sheet with parchment paper—this trick prevents sticking and ensures a consistently crisp, golden crust.
- Prepare the Dough: Open the can of refrigerated biscuits with anticipation, enjoying the satisfying pop. Separate each biscuit, and flatten them into circles about 1/4-inch thick. Even pressure is key here—keep those edges from becoming too thin.
- Fill with Flavor: Spoon approximately 1 tablespoon of pizza sauce into the center of each disc. Relish the rich, savory aroma as you layer 1 tablespoon of pepperoni and about 2 cubes or a generous sprinkle of shredded mozzarella. Remember, less is more—compact filling prevents messy overflows.
- Seal the Bombs: Gently bring the dough edges over the filling, pinching them to create a firm seal. Roll each bomb lightly in your hands until they transform into smooth, round dough balls.
- Brush & Season: Place the dough balls seam side down on the prepared baking sheet. Brush them generously with melted butter, sprinkle with grated Parmesan, and enjoy the fragrant promise of what’s to come. A dash of Italian seasoning adds an herbal burst to tease your taste buds.
- Bake to Perfection: Slide the baking sheet into the preheated oven and bake for about 15 minutes. They’re ready when the tops are golden, and your kitchen is filled with a mouthwatering aroma. Keep an eye out for that irresistible golden-brown finish.
- Serve & Enjoy: Allow a brief cooling moment before serving. The first bite brings the warmth of a gooey center, nestled in a crisp, buttery crust—a delightful experience for your taste buds.
