

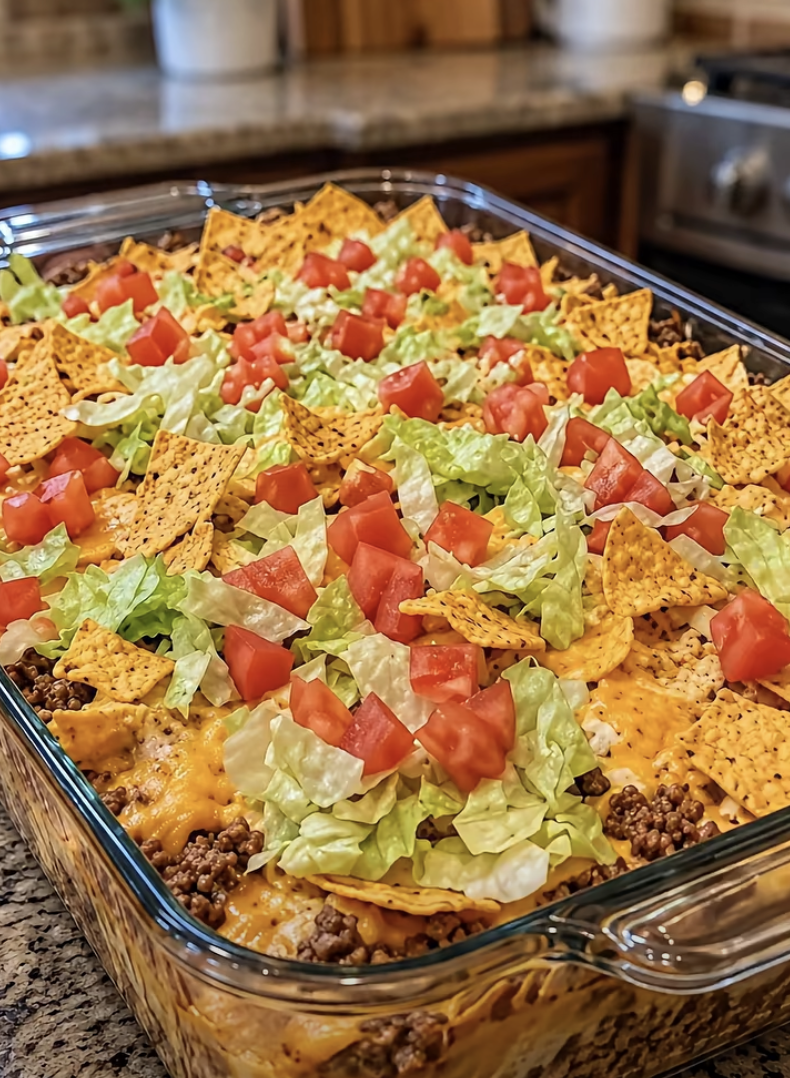
Crunchy tortilla chips tucked between layers of seasoned beef and molten cheese turn this taco casserole into a cozy, textural showdown in the best way. Everything comes together with a quick skillet browning and a single baking dish (no shells to stuff, no fuss), so the oven does the heavy lifting while the edges turn bubbly and golden. Finish with cool sour cream, fresh lettuce, and juicy tomatoes, then pass extra salsa and guacamole at the table.
Why It Works: And Why It Tastes Amazing
This Cheesy Taco Casserole With Crunchy Tortilla Chip Layers delivers big taco-night flavor without the shell-stuffing hassle. Here’s what makes it a keeper.
- Crunch That Lasts: Layering chips between beef and cheese, instead of stirring them in, preserves crunchy pockets while the bottom softens into a tender, tortilla-like base.
- Skillet to Oven: Brown the beef in one skillet, assemble in one baking dish, and let the oven finish the job while you chop toppings.
- Flavor With Depth: Simmering taco seasoning with water and salsa creates a saucy, savory filling that clings to every chip instead of turning dry.
- Family-Proof Comfort: Melty cheddar and Monterey Jack, plus familiar taco flavors, win over picky eaters while cool sour cream tames any heat.
- Smart Swaps Welcome: Ground turkey, pinto beans, or pepper jack slide in easily, so the recipe adapts to whatever your pantry and fridge offer.
- Leftovers Worth Saving: Reheated portions stay flavorful for up to three days in the fridge, making lunch prep easy. Add fresh lettuce and tomatoes after warming.
The Ingredients That Make It Work
A great Taco Casserole starts with smart ingredient choices, since each layer adds its own flavor, texture, or freshness. These quick notes explain what each one does and how to get the best results.
The Savory Base
- Ground beef: Beef with 80/20 or 85/15 lean-to-fat ratio gives the best flavor and stays juicy through baking. Drain any excess fat after browning so the filling doesn’t turn greasy.
- Onion: A small diced onion adds gentle sweetness and body to the filling. Dice it small so it softens fully while the beef browns. Yellow or white onions both work well.
- Garlic: Fresh garlic adds a warm, savory aroma that jarred versions can’t quite match. Stir it in once the onion has softened and cook just 30 seconds to avoid bitterness.
- Taco seasoning: This packet delivers the classic chili, cumin, and paprika flavor. Stir it into the meat for a minute before adding liquid to “bloom” the spices, and choose a low-sodium packet if you like to control the salt.
- Water: Just a half cup dissolves the seasoning and helps it coat the beef evenly. Simmer until slightly thickened so the filling stays saucy, not soupy.
- Salsa: Salsa adds tang, moisture, and a bit of heat. A thick, chunky jarred salsa works best, and any extra liquid should be drained off so the chip layers stay crisp.
The Hearty Add-Ins
- Black beans: Beans add fiber, protein, and an earthy, creamy bite. Rinse them well to remove the canning liquid and excess sodium, and swap in pinto beans if that’s what you have.
- Corn: Corn brings pops of natural sweetness that balance the spices. Drain canned corn thoroughly, or use frozen corn that’s been thawed and patted dry.
- Crushed tortilla chips: These create the signature crunchy layers. Choose sturdy, restaurant-style chips and crush them into bite-size pieces rather than dust. Divide them as directed so every layer gets its share.
The Cheesy Layers
- Cheddar cheese: Cheddar gives the dish its sharp, familiar flavor and golden, bubbly top. Shred it from a block if you can, since pre-shredded bags contain anti-caking agents that can keep it from melting smoothly.
- Monterey Jack cheese: This mild, buttery cheese melts beautifully and adds that gooey stretch. For a little heat, pepper jack is an easy swap.
The Fresh Finishers
- Sour cream: Sour cream adds cool, creamy contrast to the warm, spiced filling. Full-fat versions hold their shape best, and plain Greek yogurt works as a lighter substitute.
- Shredded lettuce: Lettuce provides a crisp, refreshing bite on top. Romaine or iceberg both hold up well, but shred it just before serving so it stays crunchy.
- Diced tomatoes: Tomatoes bring juicy brightness and color. Roma tomatoes work especially well, and scooping out the seeds keeps the topping from getting watery.
- Fresh cilantro (optional): Cilantro adds a bright, herbal finish that lifts all the rich flavors. If it’s not your favorite, chopped green onions or flat-leaf parsley make a fresh alternative.
Step-by-Step Instructions
- Preheat the oven to 375°F (190°C) and lightly grease a 9×13-inch baking dish. Crush the tortilla chips into bite-size pieces, not dust, and divide them into two equal portions.
- Brown the ground beef and diced onion in a large skillet over medium-high heat for 6 to 8 minutes, breaking the meat into crumbles until no pink remains. Drain the excess fat, then stir in the garlic for 30 seconds until fragrant.
- Sprinkle in the taco seasoning and stir for about 1 minute so the spices bloom. Pour in the water and salsa, then simmer for 3 to 4 minutes until the sauce thickens and clings to the beef. I like to drain off any watery salsa first, since it keeps the chip layers crisp.
- Fold in the black beans and corn, and cook for 2 minutes until heated through. The mixture should look saucy but not soupy, and it’s normal if it seems a bit loose, since the chips will absorb moisture in the oven.
- Spread half the crushed chips across the bottom of the baking dish, then top with half the meat mixture. Sprinkle over half the cheddar and half the Monterey Jack.
- Repeat with the remaining chips, meat, and cheeses, pressing lightly so the top layer is even. Bake uncovered for 20 to 25 minutes, until the cheese is bubbly and the edges turn golden. I usually check at the 20-minute mark, and if the cheese needs more color, I give it a few extra minutes.
- Rest the casserole for 5 minutes so the layers set and slice cleanly. Top with dollops of sour cream, shredded lettuce, diced tomatoes, and cilantro if you like, then serve with extra salsa.
Tip: For the crunchiest layers, assemble and bake right away. Letting the filled dish sit before baking gives the chips time to soften.
Reminder: Add the lettuce, tomatoes, and sour cream just before serving, not before baking, so they stay fresh, crisp, and cool against the hot filling.
Storage & Freezing
- Refrigerating: Let the casserole cool for about 30 minutes, then refrigerate it within 2 hours of baking. Store leftovers in an airtight container for up to 3 days, and keep the sour cream, lettuce, tomatoes, and cilantro separate. The bottom chip layer will soften into a tender, tortilla-like base, which is normal, but the toppings turn limp and watery if they sit on the hot filling overnight.
- Freezing: This Taco Casserole freezes well for up to 2 months, because the beef, black beans, corn, and cheese all hold up in the freezer. Wrap cooled individual portions tightly in foil, then place them in a freezer bag, pressing out the air to prevent freezer burn. Don’t freeze it with the toppings, since sour cream turns grainy, lettuce goes limp, and fresh tomatoes get mushy. For crunchier results, I freeze just the cooled meat-and-bean filling and assemble it with fresh chips and cheese on baking day.
- Reheating: Thaw frozen portions overnight in the fridge, then reheat in a 350°F (175°C) oven, covered with foil for 15 to 20 minutes so the center warms without scorching the cheese. Uncover for the last 5 to 10 minutes to re-crisp the top, and make sure the center reaches 165°F (74°C). The microwave is faster but leaves the chips soft, so I save it for quick lunches and use an oven or toaster oven when I want some crunch back. Add fresh toppings and a spoonful of salsa after warming.
Make Ahead Options
This Taco Casserole is perfect for meal prep, since the savory filling can be made ahead and refrigerated for up to 3 days. Cook the beef, onion, garlic, seasoning, salsa, beans, and corn as directed, cool completely, then store in an airtight container. Shred the cheeses and dice the tomatoes up to 24 hours ahead, storing each separately (so nothing turns watery). To keep the chips crunchy, crush them and assemble the layers just before baking. Rewarm the filling in a skillet for 2 to 3 minutes, layer, and bake for 20 to 25 minutes. Add sour cream and fresh toppings before serving, and it tastes just as delicious.
Expert Tips
These small adjustments make the difference between a good taco casserole and one people ask you to make again.
- Drain the salsa first: Pour the salsa into a fine-mesh strainer before simmering. Removing the watery liquid keeps the chip layers crisp and helps the beef sauce cling.
- Crush chips by hand: Press sturdy tortilla chips with your palm inside the bag. You want bite-size pieces, not dust, so each layer keeps its crunch.
- Shred your own cheese: Block cheddar and Monterey Jack melt smoother and brown better than bagged shreds, which contain anti-caking agents. I always shred mine while the beef browns.
- Bloom the seasoning: Stir the taco seasoning into the browned beef for a full minute before adding water and salsa. This deepens the flavor and prevents a raw, powdery taste.
- Judge doneness visually: I check at 20 minutes and look for bubbling edges and golden cheese. If the top looks pale, bake a few more minutes.
- Top at the table: Add sour cream, lettuce, and tomatoes only after the 5-minute rest. The cool, crisp toppings contrast with the hot filling instead of wilting into it.
Variations & Substitutions
This Taco Casserole is forgiving, so feel free to adjust it to your diet, your pantry, or your heat tolerance. These swaps have worked well without changing the crunchy layers.
- Swap the protein: Use ground turkey or chicken in place of beef, adding a tablespoon of oil to the skillet since leaner meat browns dry.
- Make it vegetarian: Skip the beef and use finely chopped sautéed mushrooms plus a second can of black beans for a hearty, meaty-textured filling.
- Lighter topping option: I swap the sour cream for plain Greek yogurt when I want a lighter topping; it’s tangier but just as cool and creamy.
- Go gluten-free: Choose certified gluten-free corn tortilla chips and a taco seasoning labeled gluten-free, since some packets contain wheat-based fillers.
- Adjust the heat: Swap Monterey Jack for pepper jack, or stir a 4-ounce can of diced green chiles into the meat for gentle heat.
- Add sweet peppers: Sauté one diced bell pepper alongside the onion for extra sweetness and color; red or orange varieties are the sweetest.
Perfect Pairings & Serving Ideas
Plate it family-style with a topping bar: After the 5-minute rest, bring the Taco Casserole to the table in its baking dish and cut it into generous squares with a wide spatula. Set out small bowls of sour cream, shredded lettuce, diced tomatoes, cilantro, extra salsa, and guacamole so everyone builds their own plate. I like this approach because the cold, crisp toppings go on right before eating and never wilt on the hot filling.
Balance the richness with something bright: Two cheeses, seasoned beef, and sour cream make a rich plate, so pair it with something fresh and acidic. Cilantro-lime rice, a crisp cucumber and jicama slaw, or simple greens in a lime vinaigrette all cut through the richness. A scoop of guacamole on the side adds creaminess without competing with the crunchy chip layers.
Pour a refreshing drink: A cold Mexican lager with a lime wedge suits the spiced beef and melted cheese. For a more festive table, serve margaritas on the rocks. Sparkling limeade, hibiscus iced tea, or a pitcher of agua fresca keep things family-friendly.
Match the serving style to the occasion: For a weeknight dinner, a square with a handful of lettuce and a dollop of sour cream is enough. For a potluck or game day, cut the casserole into smaller squares and keep it warm in the dish, with the toppings in separate bowls. I always set out a little extra salsa, since people tend to go back for more.
Recipe FAQs
- Can I assemble it ahead of time? Bake right away; waiting softens the chips.
- How do I keep the chip layers crunchy? Drain the salsa first, and shred fresh cheese.
- Can I freeze this Taco Casserole? Yes, up to two months, toppings left off.
- How do I know when it’s done? I look for bubbling cheese and golden edges.
Cheesy Taco Casserole With Crunchy Tortilla Chip Layers

A cheesy Taco Casserole with layers of seasoned beef, black beans, corn, and crunchy tortilla chips, finished with melted cheddar and Monterey Jack for a family-friendly Tex-Mex main dish.
- Prep Time: 15 minutes
- Cook Time: 35 minutes
- Total Time: 50 minutes
- Yield: 8 servings
- Category: Dinner
- Method: Skillet to oven (baked)
- Cuisine: Tex-Mex
- Diet: adaptable to gluten-free with certified corn chips, Non-Vegetarian
Ingredients
- 1 lb (450 g) ground beef
- 1 small onion, diced
- 2 cloves garlic, minced
- 1 packet (1 oz) taco seasoning
- 1/2 cup water
- 1 cup salsa
- 1 can (15 oz) black beans, drained and rinsed
- 1 cup corn, drained
- 3 cups crushed tortilla chips, divided
- 2 cups shredded cheddar cheese
- 1 cup shredded Monterey Jack cheese
- 1 cup sour cream
- 1 1/2 cups shredded lettuce
- 1 cup diced tomatoes
- 2 tablespoons chopped fresh cilantro (optional)
Instructions
- Preheat the oven to 375°F (190°C) and lightly grease a 9×13-inch baking dish. Crush the tortilla chips into bite-size pieces, not dust, and divide them into two equal portions.
- Brown the ground beef and diced onion in a large skillet over medium-high heat for 6 to 8 minutes, breaking the meat into crumbles until no pink remains. Drain excess fat, then stir in the garlic and cook for 30 seconds until fragrant.
- Sprinkle in the taco seasoning and stir for about 1 minute to bloom the spices. Pour in the water and salsa, then simmer for 3 to 4 minutes until the sauce thickens and clings to the beef. For crisper chip layers, drain any watery salsa before adding.
- Fold in the black beans and corn and cook 1 to 2 minutes until heated through. The mixture should be saucy but not soupy; the chips will absorb moisture in the oven.
- Spread half the crushed chips across the bottom of the baking dish, then top with half the meat mixture. Sprinkle over half the cheddar and half the Monterey Jack.
- Repeat with the remaining chips, meat, and cheeses, pressing lightly so the top layer is even. Bake uncovered for 20 to 25 minutes, until the cheese is bubbly and the edges turn golden. Check at 20 minutes and add a few extra minutes if more browning is desired.
- Let the casserole rest for 5 minutes so the layers set. Top with dollops of sour cream, shredded lettuce, diced tomatoes, and cilantro if using, then serve with extra salsa and guacamole on the side.
- Tip: For the crunchiest layers, assemble and bake right away. Add lettuce, tomatoes, and sour cream only after the 5-minute rest so they stay cool and crisp.
Notes
- Drain the salsa first: Pour salsa into a fine-mesh strainer before simmering to remove watery liquid and keep chip layers crisp.
- Crush chips by hand: Press sturdy tortilla chips with your palm inside the bag to get bite-size pieces, not dust.
- Shred your own cheese: Block cheddar and Monterey Jack melt smoother and brown better than pre-shredded cheese.
- Bloom the seasoning: Stir taco seasoning into the browned beef for at least a minute before adding liquids to deepen flavor.
- Judge doneness visually: Look for bubbling edges and golden cheese; if the top looks pale, bake a few more minutes.
- Top at the table: Add sour cream, lettuce, and tomatoes after baking so they stay fresh and crisp.
- Refrigerating: Cool for about 30 minutes, then refrigerate within 2 hours in an airtight container for up to 3 days. Keep toppings separate.
- Freezing: Freeze cooled portions for up to 2 months. Do not freeze with fresh toppings; for crunch, freeze only the filling and assemble with fresh chips and cheese before baking.
- Reheating: Thaw overnight, reheat covered in a 350°F (175°C) oven 15 to 20 minutes, uncover for the last 5 to 10 minutes to re-crisp. Microwave works for quick lunches but softens chips.
Nutrition
- Serving Size: 1/8 casserole (about 1 cup)
- Calories: 480 kcal
- Sugar: 4 g
- Sodium: 650 mg
- Fat: 28 g
- Saturated Fat: 12 g
- Unsaturated Fat: 14 g
- Trans Fat: 0.5 g
- Carbohydrates: 36 g
- Fiber: 6 g
- Protein: 24 g
- Cholesterol: 70 mg
